Why You May Need Physio Care For Running Injuries

Running is one of the best full-body workouts on the planet. The feeling of a runner’s high can be almost addicting, and is one of the healthiest ways to boost your mental and physical health.

But what happens if you injure yourself while running?

The fantastic team at Endurance Rehabilitation in Scottsdale, AZ, is proud to serve the local community with quality physio services, including care for running injuries so that you can get back on track as quickly as possible and pain-free.

Why You May Need Physiotherapy for Running Injuries

Feeling pain while running? Here are some signs you may need a professional:

  • Pain Management: Physiotherapy can help alleviate pain and discomfort associated with running injuries.
  • Improved Function: Targeted exercises and techniques can help restore your range of motion and improve your running form.
  • Faster Recovery: Physiotherapy can accelerate your recovery process, allowing you to return to running sooner.
  • Injury Prevention: By addressing underlying issues and improving your running technique, physiotherapy can help prevent future injuries.
  • Customized Treatment Plans: Physiotherapists can create personalized treatment plans tailored to your specific needs and goals.

Common Running Injuries

Here are some common running injuries that we treat:

  • Achilles Tendonitis: Inflammation of the Achilles tendon, which connects your calf muscle to your heel bone.
  • Plantar Fasciitis: Inflammation of the plantar fascia, the tissue that connects your heel bone to your toes.
  • Shin Splints: Pain along the shinbone caused by overuse or improper running technique.
  • Runner’s Knee: Pain in the front of the knee.
  • Stress Fractures: Tiny cracks in the bones caused by overuse.

Your Partners in Physio Excellence

Don’t let injuries bring you down. Get back to doing what you love quicker with professional physio services.

We look forward to helping you achieve your goals in a warm and welcoming environment.

During your next appointment with the professional team at Endurance Rehabilitation in Scottsdale, AZ, you can be sure you are receiving the best care and guidance you and your family deserve.

Chiropractor vs Physical Therapist: Who to See for Sports Injuries

Athletes are constantly testing their limits, which makes chiropractors and physical therapists natural solutions if they experience pain or injury. If you’re wondering which is the right professional to visit, we’ll look at what you should know.

The Nature of Injuries

Some people can put extreme stress on their bodies in short timelines without experiencing major injuries of any kind. Part of this comes down to having the right form while exercising, but it’s important to recognize that no one is immune to the pressure you’re putting on your body. This means that even people who feel great might want to consider seeing a chiropractor or sports physical therapist in Phoenix, AZ — if only they continue to stay that way.

Who to See: Chiropractors vs. Physical Therapists

Both a chiropractor and a physical therapist can help treat pain in the body and improve mobility. However, physical therapists are usually the better option for athletes because they take a more holistic approach to the body. So, instead of fixing acute back pain with a quick spinal adjustment, they’ll work with patients to test their strength and flexibility. Once a physical therapist has conducted a thorough assessment, they can develop manual interventions and training programs in Phoenix, AZ to help athletes get more out of every session.

See a Sports Physical Therapist in Phoenix

Whether you’re a consummate athlete or you’re just getting back into shape, a physical therapist can be the key to warding off injuries or helping you recover faster than you thought possible. At Endurance Rehabilitation, with locations in Phoenix and Scottsdale, our staff is here to give you the strength and flexibility you need to withstand the inevitable bumps and bruises while you play.

SHOULDER INJURY PREVENTION: PART 3

SHOULDER INJURY PREVENTION: PART 3

By Brandon Penas, PT

Shoulder Strengthening for the Overhead Athlete

The stability of the shoulder (glenohumeral) joint is primarily derived from the four rotator cuff muscles, which are: Supraspinatus, Infraspinatus, Teres Minor (Picture 1), and Subscapularis (Picture 2). In the overhead athlete, this group of muscles must work in harmony and with precision in order to compress and stabilize the head of the humerus (head of upper arm bone) in the glenoid fossa (shoulder socket) while the shoulder is moving in multiple positions. Moreover, the rotator cuff provides a counterforce to humeral head superior translation (humerus moving upward) caused by deltoid muscle activity.

Lower Half Mechanics

Inefficient dynamic stabilization of the shoulder joint will, more than likely, lead to some form of shoulder injury over time. A proper strengthening and conditioning program for these specific muscles should be prescribed and implemented in all seasons in order to reduce the risk of injury. The following exercises are specifically designed to strengthen the rotator cuff as well as the upper, middle, and lower trapezius (not discussed in detail in this article). You will find the exercises under the muscle they are designed to strengthen.

Supraspinatus

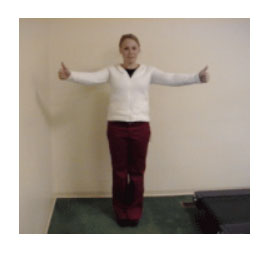
Full Can Exercise

Primary Rules: Starting at the pelvis, raise the arm to shoulder level keeping your thumbs pointing upward. Do not allow the shoulder to shrug upward during any part of this exercise.

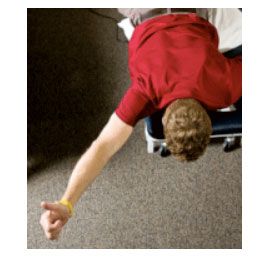
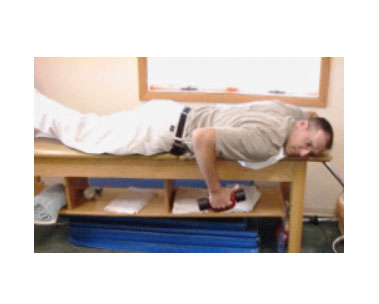
Prone Full Can Exercise

Primary Rules: Place a pillow underneath your hips to help protect your back. Look at the ground to protect your neck. Keep your shoulders from rising up towards your ears. Concentrate on squeezing your scapulas together.

Infraspinatus and Teres Minor

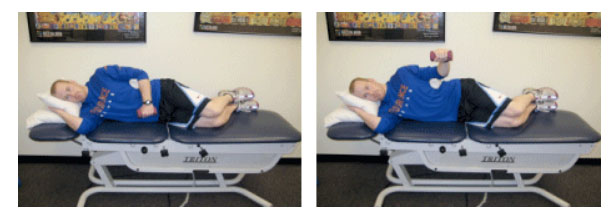
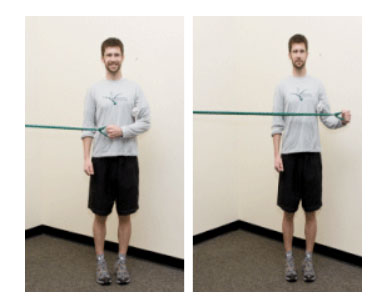
Side-lying External Rotation

Position 1: Squeeze towel roll down with elbow and keep elbow at 90 degrees at all times.
Position 2: Slowly lift hand while squeezing towel roll and not moving the shoulder backwards.

External Rotation

Primary Rules: Keep elbow at 90 degrees at all times during the above exercises. Always place a small towel roll between the arm and body just above the elbow.

Subscapularis

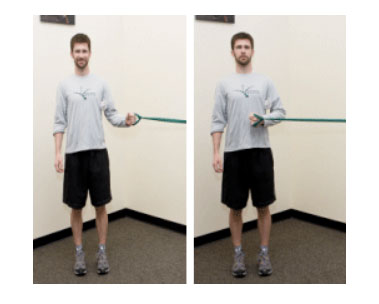
Standing Internal Rotation at 0 Degrees

Lower Trapezius

Prone Full Can

Primary Rules: Place a pillow underneath your hips to help protect your back. Look at the ground to protect your neck. Keep your shoulders from rising up towards your ears. Concentrate on squeezing your scapulas together.

Middle Trapezius

Prone Full Can Horizontal Abduction at 90 degrees

Primary Rules: Follow same rules with prone empty can exercise.

Prone Row

Primary Rules: Start with the arm at/near the floor, raise the arm up by bending at the elbow until the upper arm is level with the upper body and then return to starting position.

When strengthening the rotator cuff musculature, it is less important to perform the exercises to fatigue. Teyhen et al. published a research article in 2008 that assessed superior humeral head migration before and after rotator cuff fatigue (fatigue = 40% reduction in rotator cuff strength). At a 40% reduction in rotator cuff strength, the humeral head migrated superiorly by 0.79mm during shoulder elevation, which reduced the subacromial space (space the supraspinatus tendon travels through) up to 40% in healthy individuals (Teyhen, et. al, 2008). This level of fatigue diminishes the rotator cuff’s ability to dynamically stabilize the shoulder joint, thus putting the shoulder joint at risk for injury.

Guidelines/Recommendations for Exercise Implementation

Overhead athletes (especially pitchers) should perform rotator cuff exercises 3x/week during pre-season and in-season to maintain proper muscle strength and endurance, 1-2x/week during the off-season. Perform 2-3 sets of 15-20 repetitions per exercise unless technique/form is compromised. Performing these exercises independent of your sport-specific workout is ideal to ensure proper form and reduce the chance of generalized shoulder fatigue and muscle substitution. Quality not quantity is key!

For more information regarding this article, you can contact me via email at brandon@endurancerehab.com.

References


  • Deydre S.Teyhen, PhD, PT, OCS; Joseph M. Miller, MPT, PT; Tansy R. Middag, DPT; Edward J. Kane, PhD, PT, ECS, ATC. Rotator Cuff Fatigue and Glenohumeral Kinematics in Participants Without Shoulder Dysfunction. Journal of Athletic Training 2008;43(4):352-358.


SHOULDER INJURY PREVENTION: PART 2

SHOULDER INJURY PREVENTION: PART 2

By Brandon Penas, PT

Pitching Mechanics and the Underdeveloped Pitcher

When it comes to injury prevention and the underdeveloped pitcher, pitching mechanics should be the first line of defense. However, more often than not, this is “easier said than done” when attempting to either teach or learn the important components of the pitching motion. Oftentimes, players are more obsessed with velocity and developing off speed pitches too early, and are rarely instructed in proper mechanics at an early age. The lack of knowledge and skill in this particular area by coaches and/or parents plays a considerable role in the inability to identify of poor mechanics. The development of poor throwing mechanics over a prolonged period of time can be difficult to change and can lead to both shoulder and elbow injury at any age. In this article, I will discuss pitcher evaluation tools, break down the mechanics of pitching, and provide suggestions and drills to improve as a pitcher.

Section 1: Pitcher Evaluation

There are several aspects of the pitching game that are assessed by college coaches and pro scouts in determining the quality of a pitcher. Such aspects include command, movement, velocity, athleticism, competitiveness, and depth. However, the pitcher’s ability to reproduce his delivery will determine his long term pitch-ability. The following topics are all assessed in one way, shape, or form by college coaches and pro scouts in determining the quality of pitchers. Arm motion, arm slot, and lower half mechanics will be discussed in greater detail.

Arm Motion

Arm motion is, more than likely, the first thing a pitcher is evaluated on because it will determine if there is any potential for gains in velocity and the likelihood of future arm injuries. There are multiple types of arm motions that are taught by pitching experts and coaches including the inverted L, inverted W, and others. As a pitcher, I used an arm motion known as the down-back-up arm motion, which will be the only arm motion discussed in this article.

The down-back-up arm action is generally a slower arm motion, which requires proper timing to be effective. This action is initiated by the throwing hand dropping down as the hands separate and it extends into a long arc until it reaches its highest point (generally with the ball facing between first and second base for left-handed pitchers, and between 2nd and 3rd base for right-handed pitchers). Once the hand reaches its apex, the shoulder will rotate and progress into the pitcher’s arm slot. This type of arm motion requires good timing because the length of the arm path creates more opportunities for mechanical flaws, which can affect timing at the point of release.

A general guideline to follow regarding arm motion is to make the entire motion look natural, effortless, and the pitcher should be able to demonstrate reproducibility.

Arm Motion

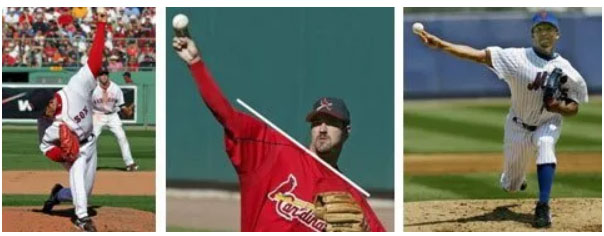
Arm slot, or the angle of the arm relative to the body at the point of release, is just as important as the pitcher’s arm motion. Typically, there are three different arm slots including: 12 o’clock, 3/4 arm slot, and side arm or submarine. Each arm slot has its advantages and disadvantages, which will be discussed briefly.

The 12 o’ clock arm slot is the most difficult to master; however, there is a distinct advantage to this arm slot as it allows the pitcher to throw at a increased downhill angle due to the high point of release. The release point for this particular arm slot has a very small margin of error; therefore, pitchers tend to miss high and low with their pitches.

The other extreme in arm slots is the side arm slot, which provides two distinct advantages including increased movement on the fastball and increased deception.

In between the 12 o’ clock and sidearm arm slots is the 3/4 arm slot. This arm slot is thought to be the most advantageous as it allows the pitcher to have a well-balanced delivery and increased control on direction and rotation. Moreover, this arm slot still allows the pitcher to throw the fastball on a downhill plane, and also allows the pitcher to use a vertical plane when throwing the curve ball.

Picture 1: Hideki Okajima and the; Picture 2: Jeff Suppan and the 3/4 arm slot; Picture 3: Pedro Martinez/sidearm slot 12 o’ clock arm slot

Lower Half Mechanics

As previously mentioned in part one of this series, the lower extremities and torso produce greater than 50% of the kinetic energy needed while pitching. That being said, lower extremity foot work and mechanics should always be addressed.

Plant/pivot leg- the pitcher should think “back side tall” with a slight bend in the plant/pivot knee. This will maintain a proper downhill plane posture. Some pitchers use the “dip and drive” method to produce increased velocity. Leg Kick- should be lifted to at least 90° with a slight rotation toward second base in order to engage the hips and increase torque during the delivery. Stride Leg – the stride leg should progress directly toward home plate/intended target and should not swing through the delivery as this can cause the hips to fly open, which leads to decrease velocity and increased strain on the throwing shoulder. Also, the stride leg should have some knee flexion (knee bend) in it in order to provide increased stability. Foot Plant – the plant foot should land closed, and thus the hips remain closed. If the plant foot lands open so do the hips, which will lead to the pitcher missing up and away more often than not.

Section 2: Breaking Down Pitching Mechanics

The terminology used to describe the stages of throwing differs throughout the literature, among pitching experts, coaches, etc. In this article, I’ll use the terminology as it was taught to me by the former Nebraska pitching coach and current head coach of the Texas A&M baseball program, Coach Rob Childress.

1) Rocker step – when starting in the wind up, the pitcher steps backward with their glove side leg at ~45° angle from the rubber.

2) Pivot step – the pitcher externally rotates his arm side leg so that the foot is parallel with the rubber.

3) Balance point – the glove side leg is raised to roughly 90° of hip flexion (some pitchers go well above 90°) with the glove and ball above and slightly behind the elevated thigh. The hands should be lowered and “broke” over the glove side leg as it simultaneously starts to progress toward the plate and into the power position.

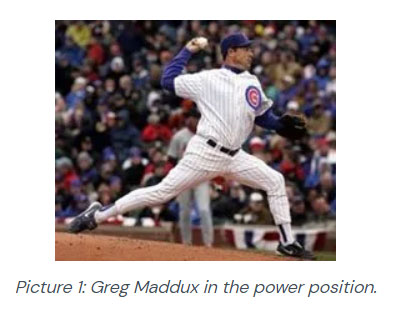
4) Power position – from the balance point to the power position, the pitcher’s stride leg extends toward home plate, landing with his foot slightly closed and on the ball of his foot. At the same time, the pitcher’s arm should be in the cocking-phase with his fingers on top of the baseball and the ball facing somewhere between 1st and 2nd base for lefties, and 2nd and 3rd base for righties. Also, the throwing elbow should be at or slightly above shoulder level.

Follow Through – the pitcher should finish on the balls of his feet with his throwing arm hanging over his opposite thigh and glove ready to field his position.

Section 3: Suggestions and Drills

Pitching from the stretch

Working on pitching mechanics from the stretch can be a useful tool when it comes to timing and rhythm. When pitching from the windup, young pitchers tend to speed through their delivery. This is commonly referred to as “rushing”. When this takes place the pitcher’s body will have a tendency to get ahead of his arm. The result will be a loss of command, especially high and to the armside of the intended target. This results from the pitchers front foot landing well before the throwing arm has a chance to be launched into the throwing slot which can greatly affect the timing of the delivery.

Pitching from the arm side of the rubber

Pitching is merely a game of multiple planes and angles, from your starting position on the rubber to offspeed pitches to different arm slots. One subtle change a pitcher can make in order to gain an advantage on hitters is to pitch from the arm side half of the rubber. For example, a right handed pitcher should set up on the right half of the rubber. Why you may ask? Setting up on the right half of the rubber provides a better throwing angle into left handed hitters and allows him to use his arm side run to his advantage against both left handed and right handed hitters. Due to the pronatory behavior of the forearm upon release, pitchers produce natural “tailing away” movement on their fastball. When coupled with a two-seam fastball there is an increased effect. That being said, when a RHP is pitching to a right handed hitter the movement of the fastball will be directed inward and the hitter’s ability to adjust in order to hit the baseball will be more difficult.

Pitcher Throwing Progressions

1) Flip Drill – the flip drill is used primarily for warming up the wrist and is the first drill in the throwing progression. Position yourself in 1/2 kneeling on your armside leg and your partner roughly 10 feet in front of you. Perform 10-15 flips or until loose.

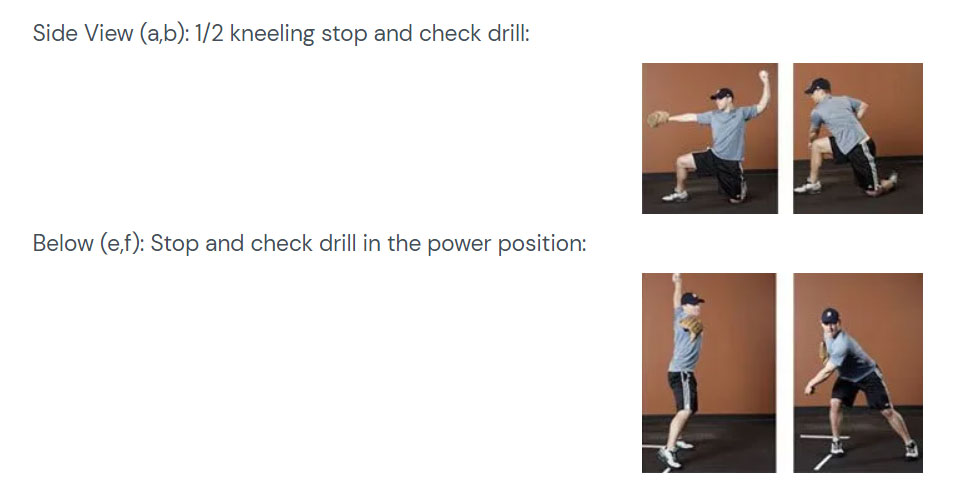
2) Stop and Check Drill (half-kneeling and power position) – the stop and check drill is used to “force” the pitcher to “stop and check” both his elbow and ball position and ensure his glove is directed at his target and he’s utilizing frontside leverage to progress to follow through. Allow roughly 30 feet in between you and your partner and complete 10-15 throws each.


3) Skip, Stop, and Check Drill – this is the third drill in the progression. This drill is nearly a duplicate of the stop and check drill in the power position (pictures e and f above) with the only thing that’s different is the “skip”. In the pictures below, the “skip” occurs after obtaining the position in the second picture in which the pitcher will “skip” on his armside leg in a forward direction and then stop in the power position (picture 3) and check his elbow and ball position, and progress to the follow through. Position your partner roughly 60-75 feet in front of you and complete 10-15 throws.

Summary

In order to develop sound pitching mechanics a pitcher must be properly informed, put in the necessary work to achieve rhythm and reproducibility, and learn and understand the game of pitching in order to be a successful pitcher. Coaches and parents must remember that pitching mechanics should not be a “cookie-cutter” mentality; however, they should attempt to modify the pitcher’s faulty mechanics without attempting to revamp his entire delivery.

References:

1. O’Leary, Chris. The pitching mechanic. Pictures of Greg Maddux, Jeff Suppan, Hideki Okajima, and Pedro Martinez. www.chrisoleary.com/projects/Baseball/Pitching/ThePitchingMechanic/index.html

SHOULDER INJURY PREVENTION: PART 1

SHOULDER INJURY PREVENTION: PART 1

By Brandon Penas, PT

Repetitive overhead throwing places significant mechanical stress on both the shoulder and elbow joint, which can lead to anatomic changes in the underdeveloped athlete. Shoulder and elbow joint injuries occur primarily due to the body’s inability to control motion segments throughout the body during the throwing/pitching delivery. Such lack of control, coupled with overuse, can lead to further structural damage in the throwing upper extremity. Therefore, coaches and parents must be able to recognize and prevent overuse in young children in order to avoid injury. Past and current research in overhead throwing injuries has focused primarily on the factors contributing to injury. Both intrinsic (age, race, gender) and extrinsic (pitch count, pitch type, showcase participation) factors have been included in such research. Although intrinsic factors are important, they are not modifiable; therefore, the modifiable, extrinsic factors will be discussed in further detail as they relate to injury.

Pitch Count

In 2001, Lyman et al. published a longitudinal study of shoulder and elbow pain in youth baseball pitchers between the ages 9-12. One area of interest related to the number of pitches thrown in games and throughout a season by youth pitchers. The results of the study showed a direct association: as the number of pitches during a game increased, the occurrence of shoulder pain increased. Moreover, a direct association was also discovered between the number of pitches thrown during the season and elbow pain among the same age group: as pitch count increased throughout the season, the occurrence of elbow pain increased4,5. Such research reiterates the importance of tracking the number of pitches thrown by young pitchers during games and the entire season. Pitch counts should pertain to “in competition” or “game intensity” pitches, and should strive to create single game, weekly, and annual pitch count limits for young pitchers. Table 1 presents a general guideline to follow as it relates to the player’s age and number of pitches per game:

Table 1: Age-Related Pitch Counts:

Age Pitches per Game
8 to 10 50
11 to 12 60
13 to 14 75
15 to 17 90

The number of pitches thrown will be different between starting pitchers and relievers. Relievers who throw multiple days per week should be kept on a weekly pitch count, and should avoid throwing more than two days in a row without a day of rest. Starting pitchers, on the other hand, should be kept on a “pitches per game” pitch count, and be allowed at least 3-4 days of rest in between games pitched. A gradual increase in pitch count limit should be allowed as the age and level of play of the athlete progresses. Remember, it’s the number of pitches that’s important, not the number of innings pitched!

Pitch Type

Every young pitcher wants to have a curveball like Barry Zito, a split finger fastball like Roger Clemens, or a slider like Randy Johnson. Having an off speed pitch in your “repertoire” as a young pitcher makes it easier to get underdeveloped hitters out. However, over time, early exposure to such pitches places an even greater demand on the immature throwing arm and can lead to joint pain and injury. Research indicates the curveball is the most dangerous and difficult pitch to learn, as it requires large forces and torques at the shoulder and elbow with significantly different mechanics than the fastball1,2. Early emphasis should be placed on proper mechanics of the fastball and change-up and progressed to include the importance of location and change of speed. Table 2 presents a general guideline to follow as it relates to the type of pitch thrown and at what age it should be incorporated:

Table 2: Age-Related Pitch Types

Pitch Type Age to Throw
Fastball 8
Change Up 10
Curveball 14
Slider 16
Split Finger 17

It’s important to remember that as the pitcher’s age and level of skill increase so do the forces at the elbow and shoulder joint with the pitching motion. Therefore, pitching mechanics and skill training are vital in overhead injury prevention, which will be discussed in greater detail in subsequent articles.

Strength and Conditioning

Although strength and flexibility of the throwing shoulder and elbow are important, core and leg strength and endurance also play an important role in determining a pitcher’s susceptibility to injury. Research has estimated that over 55% of the kinetic energy and momentum needed to throw a baseball comes from the legs and lower trunk6. The kinetic energy, or energy due to motion, begins in the lower extremities and is transferred through the trunk and throwing shoulder/arm throughout the pitching motion. Thus, if the pitcher’s legs and trunk begin to fatigue he/she produces less kinetic energy in the lower extremities and will rely on the shoulder to “make up” for the difference, which places added stress on the throwing shoulder/elbow. In an underdeveloped, underprepared, and overused pitcher, this state of fatigue can have unforgiving consequences. Most of today’s youth baseball players play multiple positions throughout the season. While some players excel as pitchers, they can’t pitch every game and, more importantly, need a break from pitching during the season! That being said, strength and conditioning programs for youth baseball players should aim to train the player both as a pitcher and position player simultaneously. Young baseball athletes should incorporate a well-balanced combination of strength, flexibility, endurance, and body awareness exercises/drills. Moreover, it’s important to expose these athletes to a stepwise progression related to age and avoid excessive training in only one area. Table 3 presents a general guideline to follow as it relates to the player’s age and strength training guidelines:

Table 3: Age-Related Strength Training Guidelines3

Age Group Strength Training Guidelines (based on age, maturity, experience)
7 or younger No weight resistance, body weight exercises only. Emphasize technique. Introduce Stretching. Make it FUN!
8 to 10 Core exercises emphasizing balance, proprioception. LIGHT resistance exercises. Scapular program. Keep it SIMPLE!
11 to 13 Progressive resistance exercises: bench, pulldowns, rows. Begin focus on rotator cuff and scapula. Core and lower extremity strengthening. Control volume to avoid overuse!
14 to 15 Total body focus with sport-specific training. Introduce plyometrics.
16 or older Advanced strengthening and flexibility. Thrower’s 10 program and plyometrics.

Seasonal Participation

Pitching outside of the player’s primary league (i.e. showcases, traveling teams, All-star tours) increases the number of pitches throw, thus increasing the risk of overuse injury. Coaches and parents should attempt to limit pitching to 9 months per year with at least 3 months off from pitching in order to decrease the risk of arm injury. At a young age it’s important to limit the pitcher to one team per season!

References
1. Elliott B, Grove JR, Gibson B, Thurston B: Three-dimensional cinematographic analysis of the fastball and curveball pitches in baseball. Int L Sport Biomech 1986; 2:20-28.
2. 2. Escamilla RF, Fleisig GS, Barrentine SW, Zheng N, Andrews JR: Kinematic comparisons of throwing different types of baseball pitches. J Appl Biomech 1998; 14:1-23.
3. Palleta, George. Injury Prevention and Treatment Techniques. Major League Baseball Medicine Conference. St. Louis, MO. January 3-5, 2008.
4. Lyman S, Fleisig GS, Waterbor JW, Funkhouser EM, Pulley L, Andrews JR, Osinski ED, Roseman JM. Longitudinal study of elbow and shoulder pain in youth baseball pitchers. Med Sci Sports Exerc., Vol 33, No 11 2001, pp. 1803-1810.
5. Lyman S, Fleisig GS, Andrews JR, Osinski ED: Effect of pitch type, pitch count, and pitching mechanics on risk of elbow and shoulder pain in youth baseball pitchers. AM J Sports Med 2002; 30:463-468.
6. Wilk, Kevin E: Restoration of Functional Motor Patterns and Functional Testing in the Throwing Athlete. Proprioception and Neuromuscular Control in Joint Stability. 2000:415-419.